Sewing Machine Not Stitching Properly? Common Fixes (AU Guide)
If your sewing machine isn’t stitching properly, the cause is almost always one of five things: incorrect threading, the wrong needle for your fabric, unbalanced thread tension, a dirty or lint-clogged bobbin area, or a damaged/bent needle.
Start by re-threading the machine from scratch with the presser foot up, fit a fresh needle suited to your fabric, then clean out the bobbin case before adjusting tension. This fixes the vast majority of stitching problems at home, without needing a repair technician.
Affiliate Disclosure: This post contains affiliate links. If you buy through them, HomeNoche may earn a small commission at no extra cost to you. Full details on our Affiliate Disclosure page.
The 5-Minute Quick Reset
Before troubleshooting a specific symptom, run through this reset. Machine repairers and manufacturer support teams consistently point to the same handful of overlooked basics as the cause of most stitching complaints so it’s worth ruling these out first, whatever the exact problem looks like.
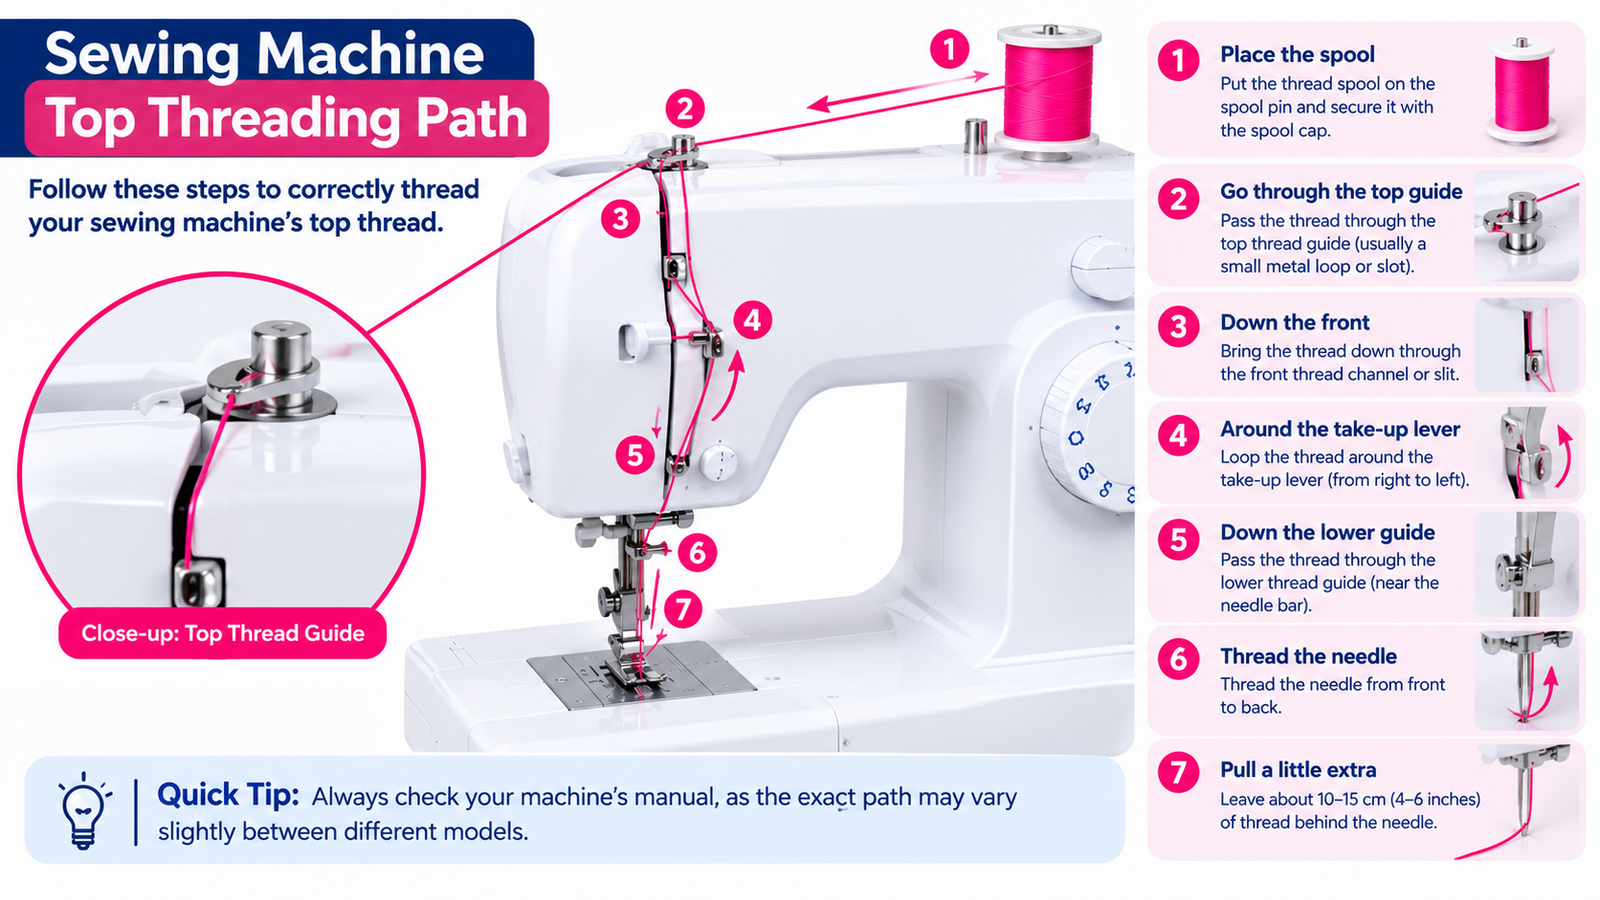
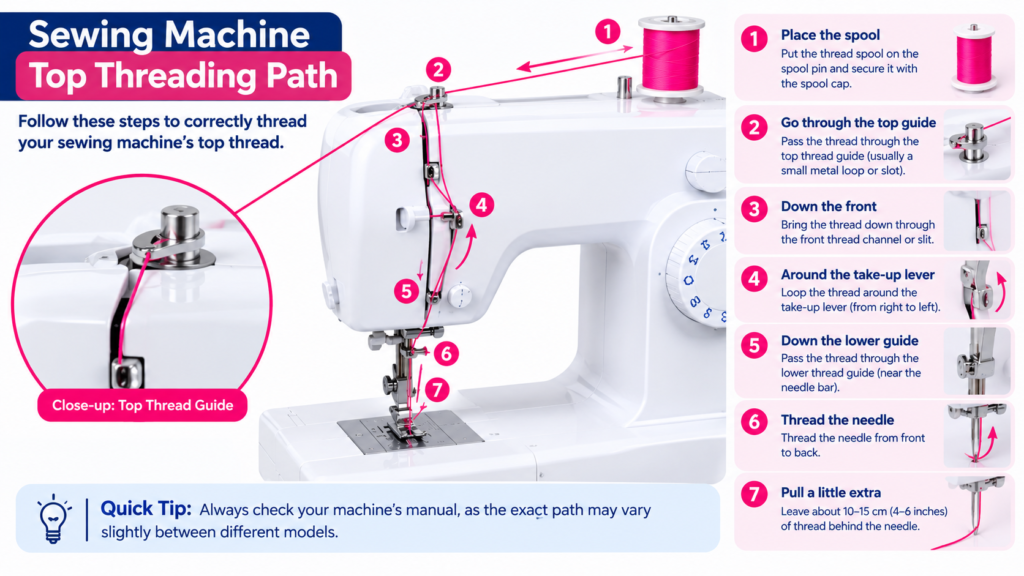
1. Raise the presser foot, then re-thread the top thread from scratch.
On most machines, the tension discs only close and grip the thread properly when the presser foot is down, thread it with the foot down and it can look threaded while sitting outside the discs entirely. This single mistake accounts for a large share of tension and bunching complaints.
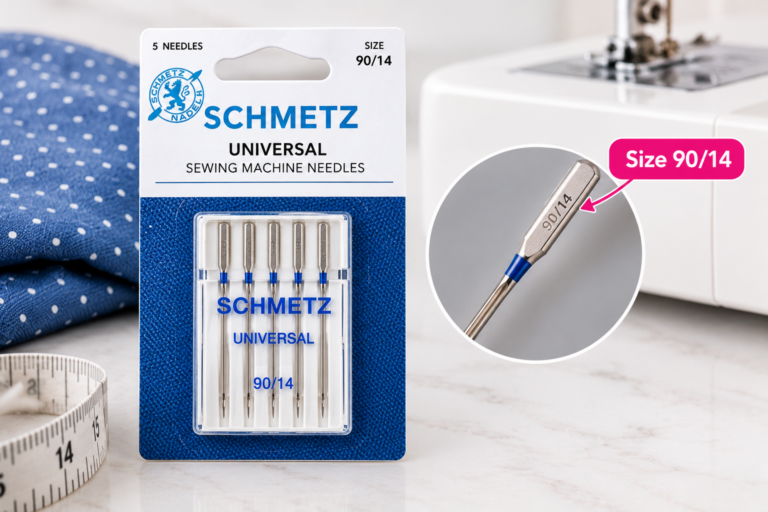
2. Fit a brand-new needle.
Push it fully up into the clamp before tightening, flat side facing the back (or as per your machine’s manual). Needles dull and micro-bend faster than most people expect.
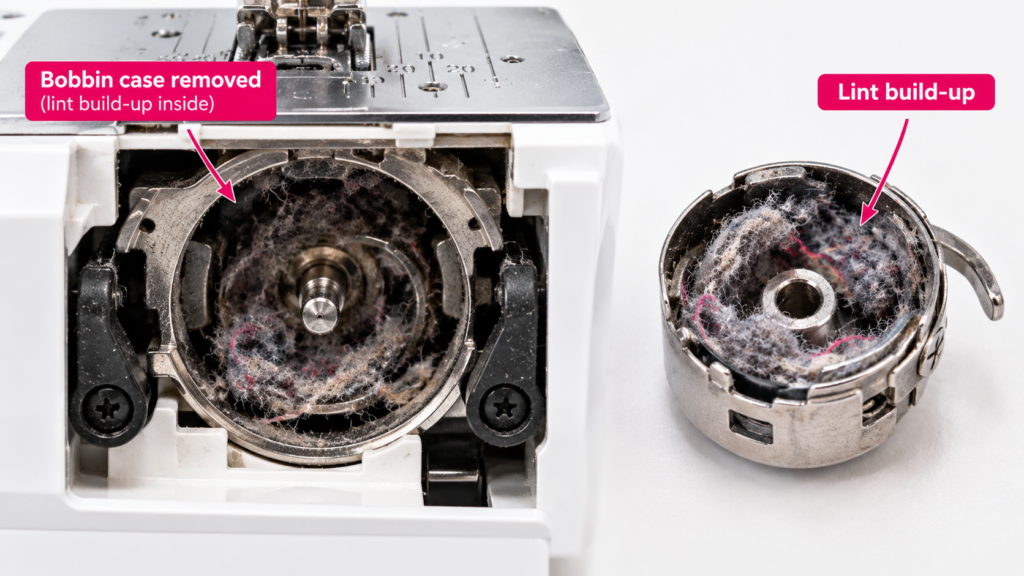
3. Remove the bobbin and clean out lint
From the bobbin case and feed the dog area with a small brush, then reinsert it the correct way around.
4. Re-wind the bobbin
If the thread on it looks uneven, loose, or lumpy.
5. Test on a scrap of the actual fabric you’re sewing
Using two layers, before returning to your project.
If the problem persists after this reset, work through the specific symptom below.
Why Isn’t My Sewing Machine Stitching Properly?
Most stitching problems come down to five root causes: threading errors, the wrong needle, unbalanced tension, lint or debris in the bobbin area, or worn/damaged parts. Sewing machines are mechanically simple but tension-sensitive; a tiny threading mistake at the start of your session can throw off the whole stitch formation process.
Understanding the basics helps when you press the foot pedal, the needle carries the top thread down through the fabric, loops around the bobbin thread, and pulls back up to lock the stitch. If any part of that chain threading, needle, tension, or feed is off, the stitch won’t form correctly.
Key terms:
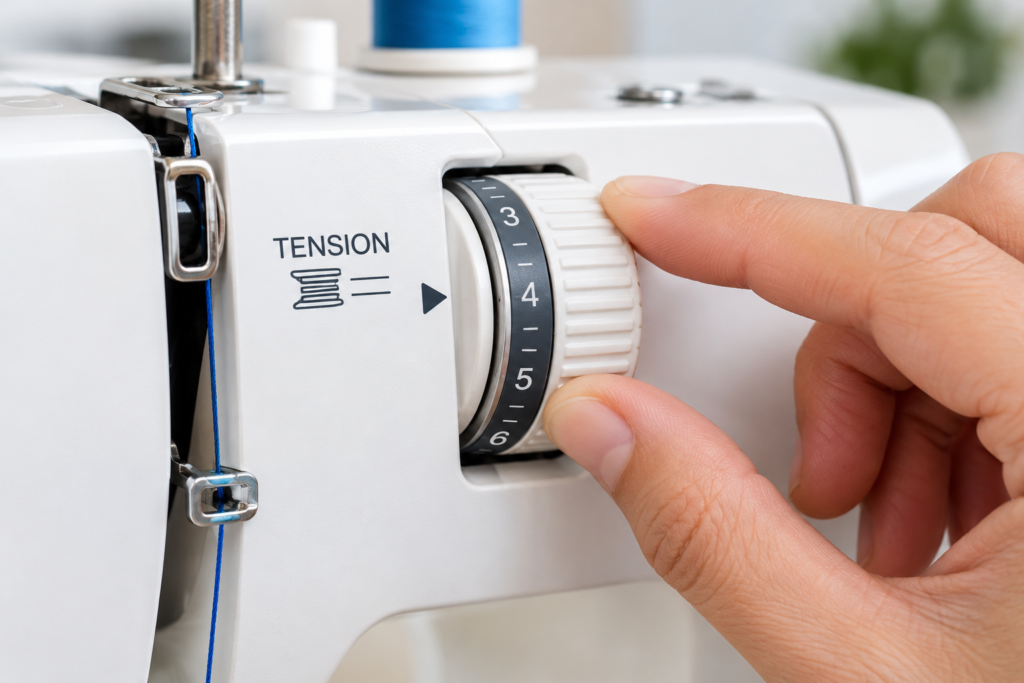
Definition Thread tension: The amount of resistance applied to the thread as it feeds through the machine. Balanced tension means the top and bobbin threads lock in the middle of the fabric layers, invisible from either side.
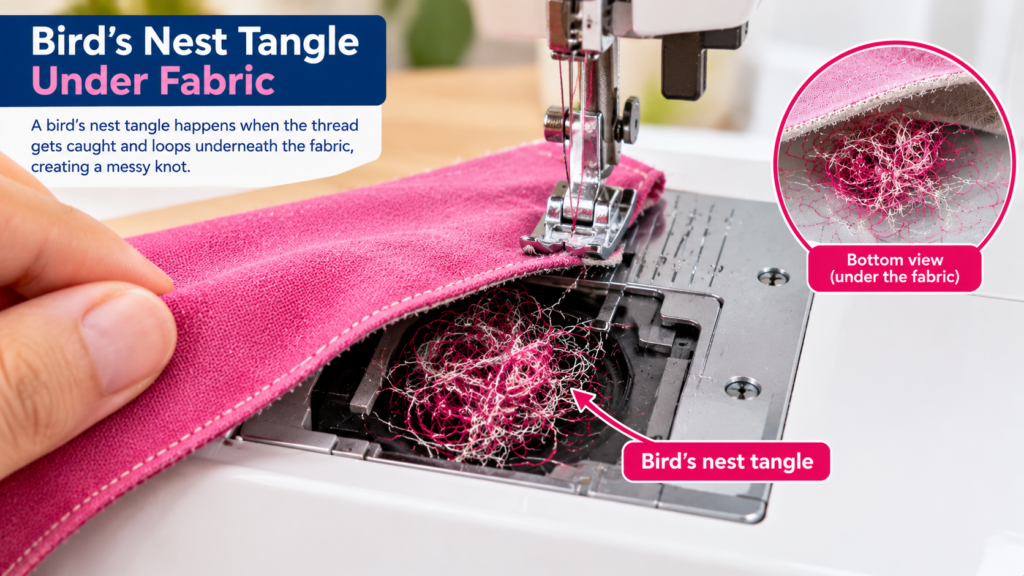
Definition Bird’s nesting: A tangled clump of thread that forms underneath the fabric, usually from tension imbalance or incorrect bobbin threading.
Skipped Stitches
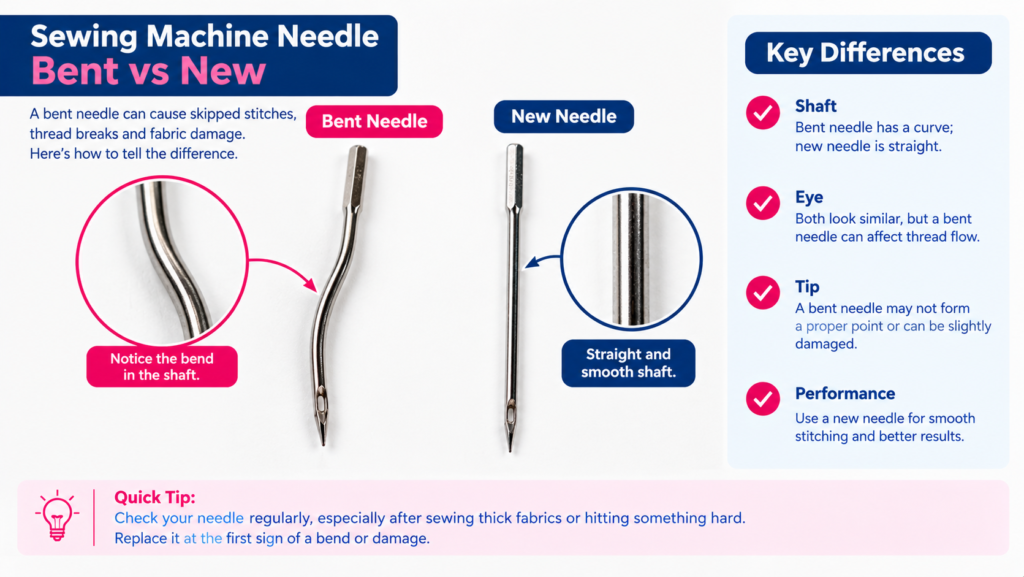
Skipped stitches are usually caused by a bent, dull, or wrong-type needle, or incorrect threading that stops the top thread from meeting the bobbin thread at the right moment.
To fix it:
- Replacing the needle with even a slightly bent tip can cause skipping, and needles dull faster than most people expect (every 6–8 hours of sewing is the general guide).
- Match the needle to your fabric (e.g. a universal or ballpoint needle for knits, a sharp needle for wovens).
- Re-thread both the top and bobbin thread from scratch, making sure the top thread is seated correctly in the tension discs and take-up lever.
- If skipping continues after these steps, the machine’s timing may be out of sync — this needs a professional repairer rather than a DIY fix.
Loose or Loopy Stitches on Top
Loose, loopy stitches on the top of your fabric usually mean the top thread tension is too tight, or the machine isn’t threaded correctly with the presser foot up.
To fix it:
- Raise the presser foot before threading on most machines this opens the tension discs so the thread seats correctly. Threading with the foot down is a common beginner mistake.
- Re-thread the top thread fully, checking it passes through every guide and disc.
- Adjust the top tension dial in small increments (half a number at a time) and test on scrap fabric after each change.
- Check that your top and bobbin thread are the same weight, mismatched thread weights throw tension out of balance.
Bird’s Nesting Underneath the Fabric
Bird’s nesting a tangled clump of thread under the fabric is almost always caused by loose top tension or incorrect threading, not a bobbin fault, despite how it looks.
To fix it:
- Re-thread the top thread carefully, with the presser foot raised.
- Clean the bobbin case of lint and debris (a small brush or blast of canned air works well).
- Check the bobbin is inserted the correct way and hasn’t been wound unevenly.
- Tighten the top tension gradually and test on a scrap piece.
- If nesting happens right at the start of a seam, hold both thread tails (top and bobbin) as you begin stitching.
Thread Keeps Breaking
Breaking thread is most often caused by poor-quality or old thread, incorrect threading, a damaged needle, or tension set too tight.
To fix it:
- Switch to a good-quality polyester or cotton thread suited to your fabric cheap thread frays, sheds lint, and snaps more easily.
- Replace the needle if it’s bent, burred, or the wrong size for the thread weight.
- Re-thread the machine, checking the thread isn’t catching on a rough spot or old lint build-up.
- Loosen the tension slightly and test again.
Needle Moves But No Stitch Forms
If the needle is moving but no stitch is forming, the top thread usually isn’t catching the bobbin thread often due to incorrect bobbin insertion or a threading fault.
To fix it:
- Check the bobbin is inserted the correct way around (an upside-down or backwards bobbin won’t catch properly).
- Re-thread both top and bobbin thread from scratch.
- Inspect the needle for damage and confirm it’s fully inserted and tightened.
- If the problem persists, the hook timing inside the machine may have shifted; this requires a professional repair.
Uneven or Puckered Stitches
Puckering or uneven stitches usually point to tension that’s too tight, the wrong needle for the fabric weight, or presser foot pressure that’s mismatched to the fabric.
To fix it:
- Loosen the tension slightly, especially on lightweight or delicate fabrics.
- Use a finer needle for thin fabrics (e.g. size 70/10) and a heavier one for thick fabrics or denim.
- Adjust presser foot pressure if your machine allows it too much pressure drags and bunches lightweight fabric.
- Consider a stabiliser or tissue paper underneath very thin or stretchy fabric to help it feed evenly.
Machine Jams or Locks Up
A jammed or locked machine is often caused by thread tangled in the bobbin area, a broken needle fragment caught inside, or a build-up of lint restricting movement.
To fix it:
- Stop immediately, don’t force the handwheel, as this can bend or break parts further.
- Turn the handwheel gently backwards to release tangled thread.
- Remove the needle plate (if your machine allows) and clear out lint, thread fragments, or broken needle pieces.
- If the jam doesn’t clear or you hear grinding, stop and take it to a repairer forcing a jammed mechanism can cause lasting damage.
Fabric Isn’t Feeding Through Properly
If fabric isn’t feeding evenly, check the feed dogs (the teeth under the needle plate) they may be lowered, clogged with lint, or worn down.
To fix it:
- Confirm the feed dog drop lever (used for free-motion sewing) is in the raised, “engaged” position.
- Clean lint and thread from around the feed dogs with a small brush.
- Check presser foot pressure isn’t too low, which can prevent the fabric from gripping the feed dogs.
- On very thick or slippery fabric, consider a walking foot for more even feeding.
DIY Fix or Call a Repairer?
Symptom | Try This Yourself | See a Professional If |
|---|---|---|
Skipped stitches | Re-thread, new needle, correct needle type | Skipping continues after re-threading and new needle (possible timing issue) |
Loose/loopy top stitches | Re-thread, adjust top tension | Tension won’t balance even after cleaning and re-threading |
Bird’s nesting | Re-thread, clean bobbin area, adjust tension | Nesting happens constantly regardless of adjustments |
Thread breaking | New thread, new needle, loosen tension | Breaking continues with fresh thread and needle |
No stitch forming | Check bobbin insertion, re-thread | Needle moves correctly but hook doesn’t catch thread (timing) |
Jammed/locked machine | Clear thread and lint gently | Grinding noise, resistance, or won’t release after gentle clearing |
Key Takeaways
- Most stitching problems are threading, needle, or tension issues not a broken machine.
- Always re-thread with the presser foot up, and start troubleshooting with a fresh needle.
- Clean the bobbin area regularly; lint build-up is a leading cause of tension and jamming issues.
- If a problem persists after basic fixes, it’s likely a timing issue that needs a professional repairer don’t force the machine.
Conclusion
Most stitching problems can be traced back to threading, needle, or tension issues all fixable at home with a bit of patience. Work through the checks above in order (thread, needle, tension, cleanliness) before assuming the worst. If your machine still isn’t stitching properly after trying these fixes, it’s likely a timing or mechanical issue that’s best left to a qualified repairer.
Frequently Asked Questions
About Author

Muhammad Irfan Malhi is Content Researcher at HomeNoche. He researches and writes buying guides for home, kitchen and craft products, drawing on manufacturer specifications, retailer data, and Australian consumer sources to help readers make informed decisions. This guide is based on independent research rather than in-house product testing.