How to Choose a Sewing Machine Needle: Size & Type Chart
The right sewing machine needle depends on two things your fabric type (which determines the needle type, e.g. universal, ballpoint, or jeans) and your fabric weight (which determines the needle size, from fine 60/8 needles for chiffon up to heavy-duty 110/18 needles for denim and canvas). Matching both correctly prevents skipped stitches, needle breakage, and fabric damage the three most common needle-related sewing problems.
Affiliate Disclosure: This post contains affiliate links. If you buy through them, HomeNoche may earn a small commission at no extra cost to you. Full details on our Affiliate Disclosure page.
Table of Contents
Key Takeaways
- Needle type matches your fabric’s structure (woven, knit, denim, leather); needle size matches your fabric’s weight.
- Most needle breakage and skipped stitches are a needle problem, not a machine fault checking the needle is the fastest first fix.
- Replace your needle every 8–10 hours of sewing, or at the start of every new project.
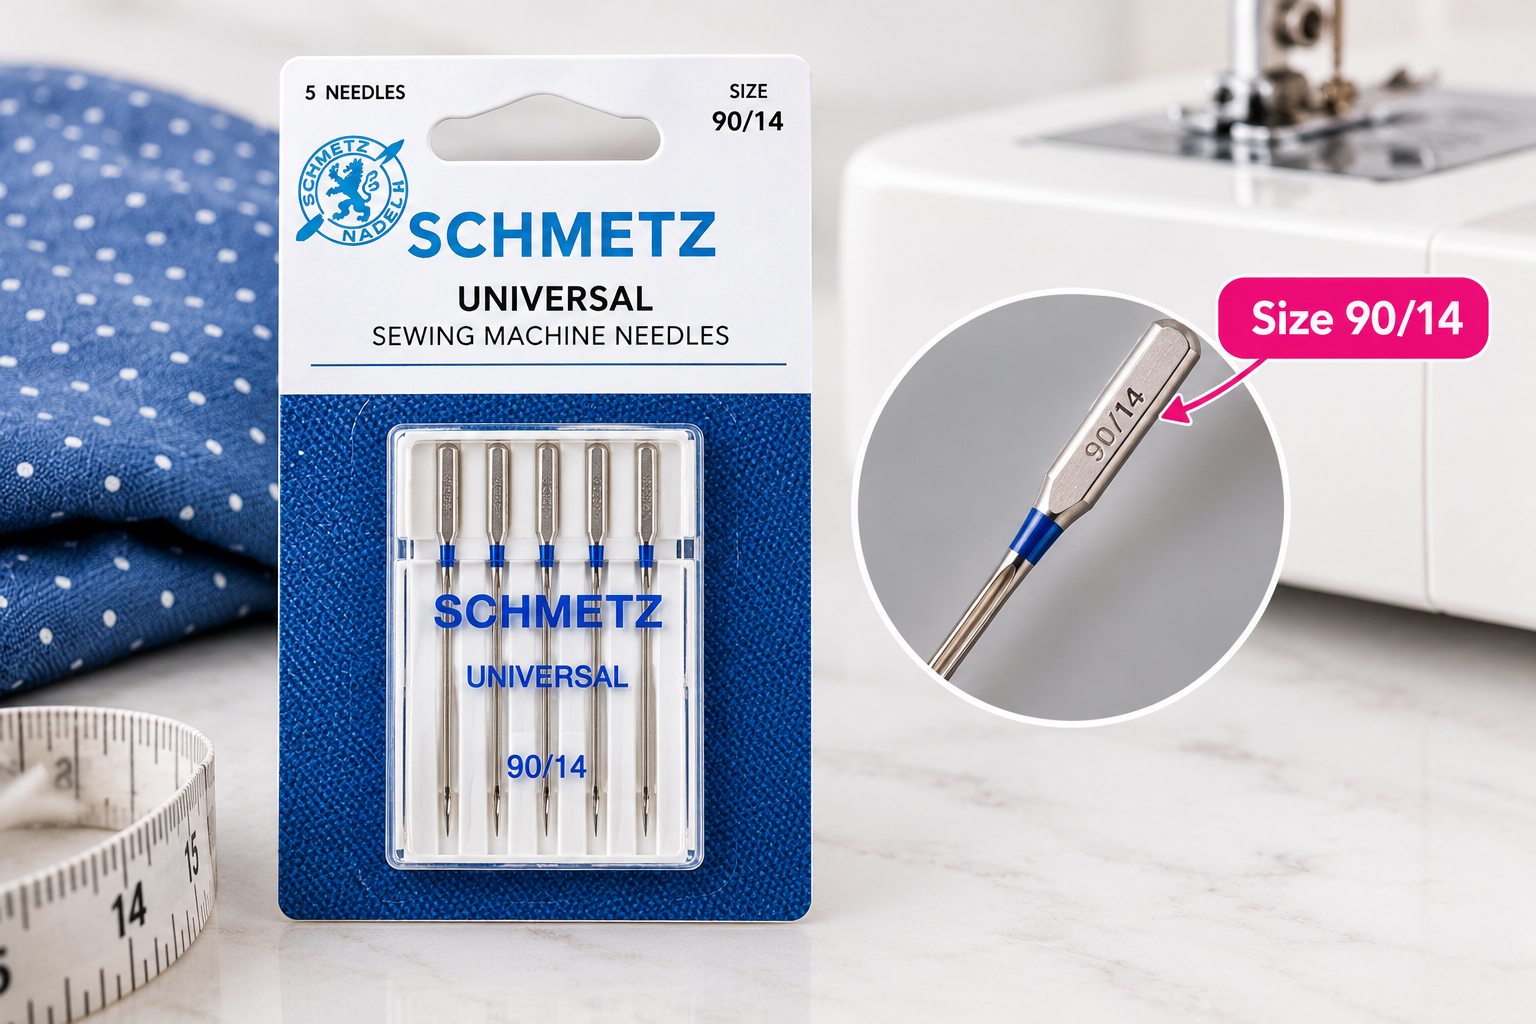
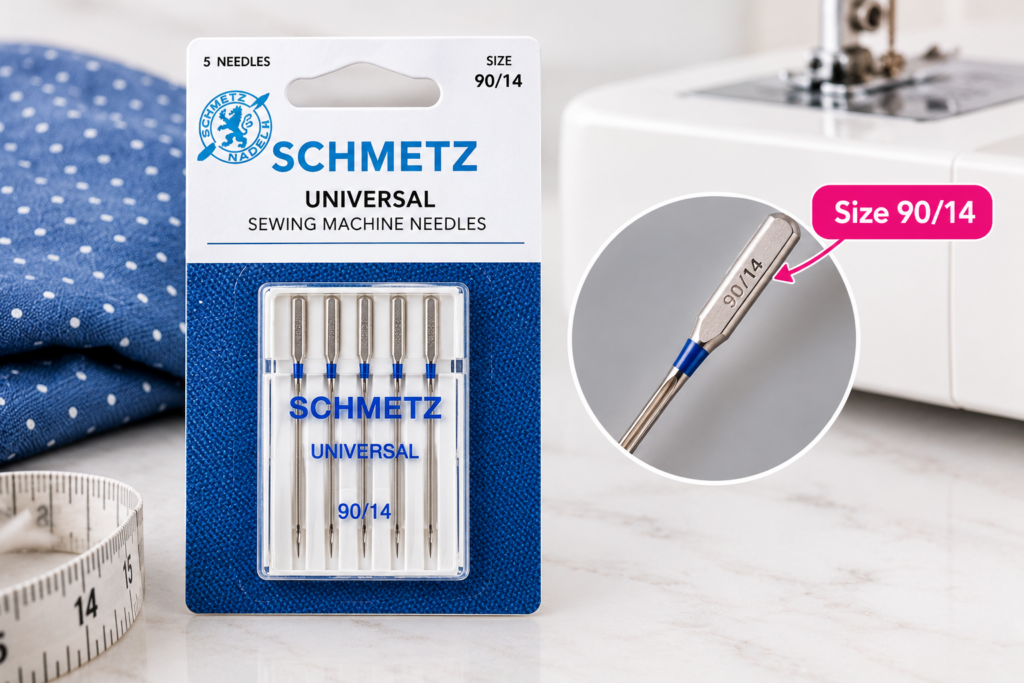
- Needle sizes are shown as two numbers (e.g. 90/14): the first is the European size (shaft diameter in tenths of a millimetre), the second is the American size.
- A full needle/fabric reference chart is below so you can check your project at a glance.
Understanding Needle Anatomy and Sizing
Needle size tells you the shaft diameter the higher the number, the thicker the needle while needle type tells you what fabric or task it’s built for.
Every home sewing machine needle sold in Australia has a size printed on the packet as two numbers separated by a slash, such as 90/14. The first number is the European size, which is roughly the needle’s diameter in tenths of a millimetre (so a size 90 needle is about 0.9mm thick). The second number is the American size, an older sizing system still used on most packaging.
A needle is made up of a few key parts that determine how it performs:
Definition: Needle Scarf The scarf is the small groove above the eye of the needle. It allows the machine’s hook to catch the thread and form a stitch. Different needle types have differently shaped scarves this is one reason a stretch needle behaves differently to a universal needle even at the same size.
- Shaft the thickness, which determines the size number
- Point sharp, ballpoint, or a hybrid, depending on fabric type
- Eye the hole the thread passes through; larger needles have larger eyes for thicker thread
- Scarf the groove that helps the machine’s hook catch the thread
- Flat shank the flattened top that ensures the needle sits correctly in the machine
Most Australian home sewing machines use the standardised 130/705H needle system, meaning needles are largely interchangeable between brands (Schmetz, Organ, Klasse, Janome) as long as the size and type suit your fabric. It’s still worth checking your machine’s manual, as a small number of machines (including some vintage and compact models) use different systems.
Sewing Machine Needle Types Explained
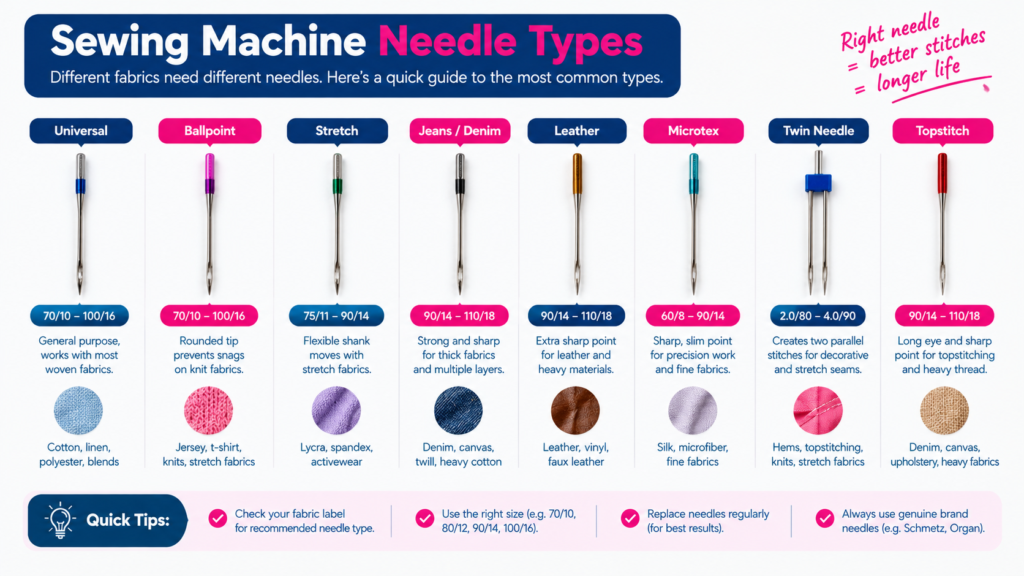
Match the needle type to how your fabric is constructed. Woven fabrics need a sharp point, knits need a rounded (ballpoint) point, and specialty fabrics like denim or leather need reinforced or specially shaped needles.
Needle Type | Point Shape | Best For |
|---|---|---|
Universal | Slightly rounded sharp point | General-purpose sewing, mixed-fibre fabrics, beginners |
Sharp (Microtex) | Very sharp, fine point | Wovens cotton, linen, quilting cotton, silk |
Ballpoint (Jersey) | Rounded point | Knits, jersey, interlock separates fibres instead of piercing them |
Stretch | Rounded point with special eye/scarf | Swimwear, spandex, highly elastic fabrics prone to skipped stitches |
Denim (Jeans) | Very strong, sharp, reinforced shaft | Denim, canvas, upholstery fabric |
Leather | Chisel/spear-shaped point | Genuine leather, suede |
Quilting | Slightly rounded, tapered point | Multiple layers, quilting cotton, patchwork |
Embroidery | Slightly rounded, larger eye | Machine embroidery, decorative/rayon thread |
Topstitch | Sharp point, extra-large eye | Heavy topstitching thread, decorative stitching |
Twin/Double | Two needles on one shank | Pintucks, hemming knits, decorative parallel stitching |
Using the wrong type (rather than the wrong size) is one of the most common causes of skipped stitches on knit fabric. A sharp needle used on a jersey will pierce and damage the fibres instead of sliding between them, which both skips stitches and can leave visible holes.
Needle Size and Fabric Chart
Lighter fabrics need finer (lower-number) needles; heavier fabrics need thicker (higher-number) needles. Use the chart below to match size to your project.
Needle Size (EU/US) | Fabric Weight | Example Fabrics |
|---|---|---|
60/8 | Very lightweight | Chiffon, voile, fine silk, tulle |
70/10 | Lightweight | Lawn, organza, lightweight cotton |
75/11 | Light-medium | Rayon, light knits, quilting cotton |
80/12 | Medium | Quilting cotton, linen, poplin, light knits |
90/14 | Medium-heavy | Denim (light), corduroy, wool, heavier linen |
100/16 | Heavy | Denim, canvas, upholstery fabric, faux leather |
110/18 | Very heavy | Heavy denim, thick canvas, multiple layers |
120/19 | Extra heavy | Heavy leather, webbing, industrial-weight fabric |
Sizing bands are approximate and based on general manufacturer guidance (Schmetz, Organ, Singer). Always check your specific fabric and thread weight, and test on a scrap piece before starting your project.
How to Insert a Needle Correctly (Step-by-Step)
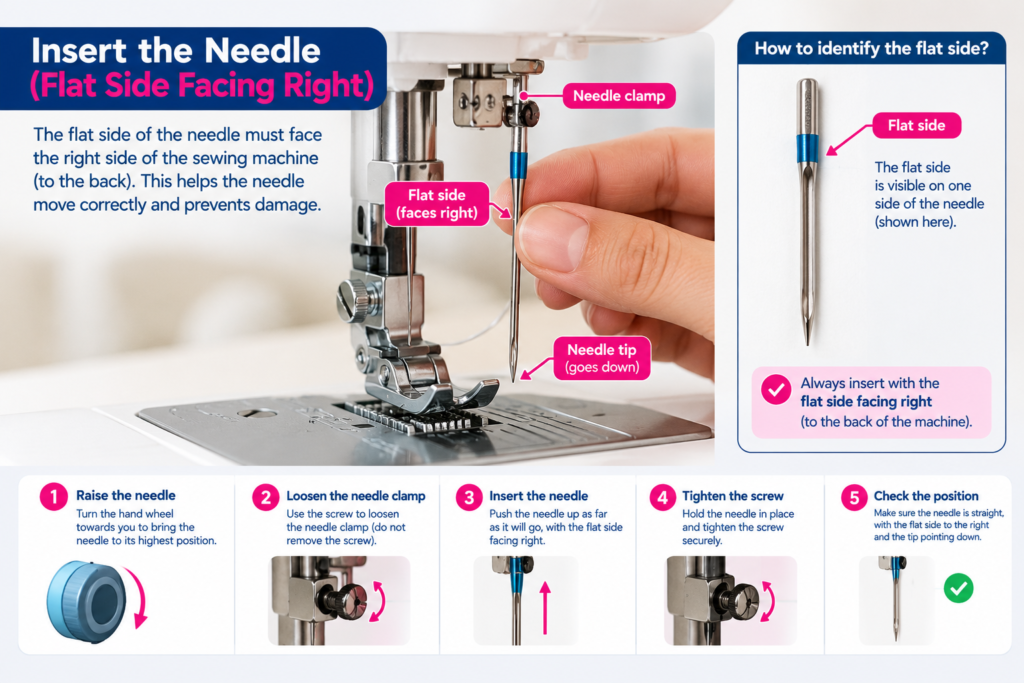
Turn off and unplug your machine, remove the old needle, then insert the new needle flat-side-back, push it fully up into the clamp, and tighten the screw securely.
- Switch off and unplug your machine. This prevents the machine from being accidentally activated while your hand is near the needle area.
- Raise the needle to its highest position. Turn the handwheel towards you until the needle bar is fully up.
- Loosen the needle clamp screw using a screwdriver or the machine’s built-in tool, and remove the old needle.
- Check the flat side of the new needle. On almost all home machines, the flat side of the shank faces towards the back of the machine.
- Insert the needle as far up as it will go into the clamp. Even a small gap will cause skipped stitches or breakage.
- Tighten the clamp screw firmly, but avoid overtightening, which can damage the screw thread over time.
- Test on a scrap of your project fabric before sewing the real thing, checking for even stitches and no skipping.
When to Change Your Needle
Replace your sewing machine needle every 8–10 hours of active sewing, at the start of every new project, or immediately if it’s bent, dull, or has hit a pin.
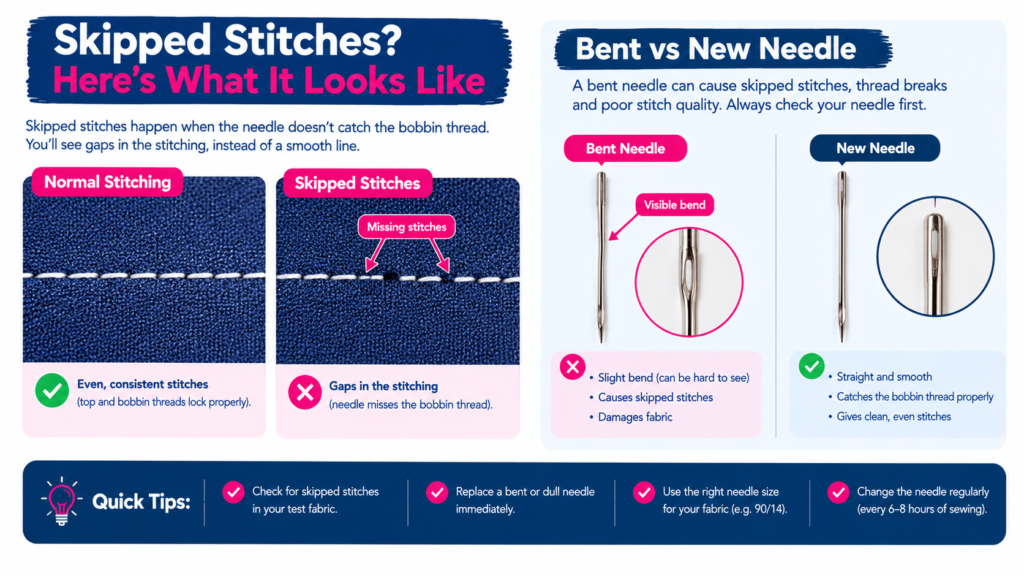
Needles dull faster than most sewists expect, and a dull or slightly bent needle is one of the leading causes of skipped stitches, snagged fabric, and thread breakage. Signs it’s time for a new needle include:
- A popping or thudding sound as the needle passes through fabric
- Small snags, pulls, or holes appearing in your fabric
- Skipped stitches that weren’t happening earlier in the project
- Visible bending, even slightly, when you inspect the needle side-on
- The needle has struck a pin, zip, or other hard object
Needles are inexpensive relative to the fabric and time they can save when in doubt, change it.
Troubleshooting: Fixing Problems With the Right Needle
Most needle-related sewing problems skipped stitches, breakage, and fabric damage are solved by matching the needle type and size correctly to your fabric, then replacing a worn needle.
Skipped Stitches
Usually caused by a dull or bent needle, or the wrong needle type for the fabric (particularly using a sharp needle on knits). Insert a fresh needle of the correct type first this resolves the majority of cases before you need to check tension or timing.
Needle Breakage
Often caused by a needle that’s too fine for the fabric weight, fabric being pulled or pushed rather than fed naturally, or the needle not being fully seated in the clamp. Re-check your size against the chart above and make sure the needle is pushed all the way up before tightening the clamp screw.
Fabric Damage or Holes
Typically a sign the needle is too thick, too sharp, or the wrong type for a delicate or stretch fabric. Switching to a finer needle or a ballpoint/stretch needle usually resolves this.
Thread Fraying or Shredding
Can happen when the needle’s eye is too small for the thread being used, or when the needle is dull and creating friction as it passes through fabric. Match thread weight to needle size, and replace worn needles promptly.
Note: If changing the needle doesn’t resolve the issue, the next things to check are your machine’s threading path and tension settings but starting with the needle is the fastest and cheapest first step.
Pros and Cons of Common Needle Types
Universal Needles
- ✅ Work across a wide range of fabrics good for beginners and mixed sewing
- ❌ Not ideal for specialty fabrics like leather, heavy denim, or very stretchy knits
Ballpoint/Stretch Needles
- ✅ Prevent skipped stitches and snagging on knits and stretch fabric
- ❌ Not suitable for woven fabrics, where a sharp point gives cleaner stitches
Denim/Jeans Needles
- ✅ Strong enough to handle thick, tightly woven fabric without bending
- ❌ Overkill (and can leave larger holes) on lightweight or delicate fabrics
Leather Needles
- ✅ Cut cleanly through leather and faux leather without dragging
- ❌ Will damage woven or knit fabric if used by mistake, since the chisel point cuts rather than separates fibres
Summary
Choosing the right sewing machine needle comes down to matching type to your fabric’s structure and size to its weight. Most skipped stitches, breakage, and fabric damage trace back to the needle rather than the machine itself, so it’s usually the fastest and cheapest fix to try first. Keep the reference chart above handy, replace your needle every 8–10 hours of sewing, and always test on scrap fabric before starting a project.
Looking for more sewing machine care tips? Learn how to keep your machine clean and running smoothly with our guide: How to Maintain and Clean Your Sewing Machine.
Frequently Asked Questions
About Author

Muhammad Irfan Malhi is Content Researcher at HomeNoche. He researches and writes buying guides for home, kitchen and craft products, drawing on manufacturer specifications, retailer data, and Australian consumer sources to help readers make informed decisions. This guide is based on independent research rather than in-house product testing.